Bogie Stations 101
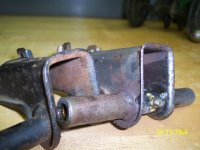
The Diablo Bogie Station design are simple pivot mounted assemblies that rely on a rubber spring to support downward pressure on the track. Bogie stations on the 500 are different than the bogie stations on the 502/3 models. Let’s start by talking how they are constructed.
The first indication that you have bogie stations for the 500 is the obvious spring clip instead of the weld to hold the wheel on the shaft. On the 500’s, the bogie pivot bolt is also held in place by a spring clip. This was changed on the 502/3 models and welds replaced the clips on the wheels and cotter pins replaced the clips on the pivot bolt.
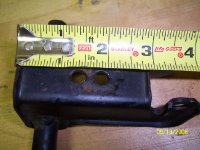
A less obvious difference between the two is the 500 bogie has less of a curved support around the center “U” brace. On the 502/3 models, Bolens added material to the bend much like car doors have brakes or bends in the panels to stiffen them. The added support makes the later model bogies more durable. Note – ignore the grease fitting and zerk holes as niether original bogies came with grease zerks.
Mike L from Milford, New Hampshire adds:
Hey, that is cool to see one apart! I just wanted to add that the 500 bogies have thinner gauge steel than the 502/3 bogies. That last 500 I got had the bogies all broken. A combination of no rubber on the frame rail mountings, lighter steel and riding it hard. They did not last long!
The last difference between the models is the location of the rubber spring mounting hole. The 500 bogie on the left has only one mounting hole and it put the rubber spring closest to the pivot pin. This location increased the “lift” of the bogie. With the redesign of the bogie rail on the 502/3 models, another hole was introduced into the bogie further away from the pivot which allowed the bogie to set more level and closer to the rail. Relating to leverage, this rubber spring now mounted further away from the pivot pin reduces the force applied to the pin and bogie assembly again making for a more reliable assembly.
Note: You may find a rare bogie wheel station that has the spring clips (telling us it is a 500 bogie station), but double rubber spring holes and a thicker “U” brace. These are bogie stations from late in 67′ when Bolens was making upgrades from the 500 design to the 502/3 design. You tend to find these bogies on Diablo 500 with serial numbers around 15000 and above.
In the 502/3 parts manuals, you might have noticed that the single bogies have two part numbers. The difference between the single bogies is where the rubber bumper is mounted and that the station closest to the idler wheels have an extra spacer washer under the bumpers to lift it higher. The single bogies closest to the idler sprockets should have the bumper installed in the closest hole to the bogie pivot with this spacer washer under it which increases the pressure it puts down to the track and also moves the tires of these stations a little farther away from the leaf spring for the idler wheels. The rest of the single bogies have the bumper mounted in the hole away from the mount as described above.
In addition to the 12 single bogie stations are 2 double bogie stations that are located directly after the drive sprocket. These double bogies are very open to damage from trail riding and are often found bent up or broken. These bumpers should also have a spacer washer under them.
So to clarify:
- A 500 bogie station should only be used on a 500. If a 500 bogie is put on a 502/3, it will have too much “lift” and will not properly align the track.
- A 502/3 bogie wheel can be used on all models. If used on a 500, install the rubber bumper closest to the pivot pin. If on a 502/3, install the rubber spring away from the pivot pin except for the two bogies just prior to the Idler Sprockets. Mount those two rubber bumpers closest to the pin.
It’s important to understand this difference in design of the bogie rail. The picture above is the mount from a 500. The mounts have metal inserts. With the rail redesign on the 502/3 models, a rubber bushing was installed and an “anti-flip” pin was welded to the mount to stop the bogie from flipping over (upper right picture above). Without the pin, the bogie stations can flip over center and will almost certainly get ripped off the bogie rail. It is important to add this “anti-flip” pin to your bogie rails to avoid this.
If you go to reinstall your bogies into your 502/3 and find the rubber bushing worn out in the chassis, you can use a 3/8″ ID piece of rubber hose for a bushing.
All bogies are designed with a bronze bushing on each end of the tube. The tube end is machined out to accept the bushing and the shaft should turn in the bushing, not the bushing in the tube. These bogie stations look like you could press them apart and replace the bushings, but I have found that to be very difficult and the stations do not come apart.
The reason I wanted to know how it was put together was to better understand what causes them to lock up and how to lubricate them. Now knowing that the bushing is on each end, that is the area that needs to be heated if you have a bogie with a frozen shaft. Heating the center will not help. It is also important to lubricate with oil and not grease. Pumping grease into the tube will eventually push the brass bushings outward against the steel rim and then the bushings will spin with the axel and that is not good.
One other bushing note is that when adding reinforcement welds to strengthen the connection between the U bracket and the tube, avoid the area of the bushings. On single bogies, the bushings are far away from the weld so there is no concern about damaging the bushing. On the double bogies however, you can’t weld on the outer edges of the tube, or the weld will blow through the steel and damage the bushing.
None of the original bogies supplied with the sleds had grease fittings on them. If you bought a new bogie, it may have come with a fitting as Bolens made this update on their replacement bogie assembly. I do not suggest installing a grease zerk in the station. Just drill a small hole and lubricate with oil from an oil can.
Often the rims under the bogie tires rust a bit or get dry and then the tire can be easily knocked off center. You would think you have a bad tire, but removing them, lubricating and reinstalling them allows the tires to seat down in the rims properly. The rubber tires on the bogies can be removed by grabbing the tire with a pliers and them pulling them sideways while getting a screwdriver under the tire. Then with a couple of screwdrivers, you can work the tire off the steel rim.
The purpose of the rubber bumpers is to support and lift the bogie station and provide support of the track. Shown above is a new bumper. Unfortunately, after driven for many years, your original bumpers won’t look this nice. They tend to get squashed down or delaminate from the mount. As of today, I have never found a bumper that I could buy that comes close to the shape and durometer of the original bumpers.
We are reproducing bogie tires and bumper at this time for a limited time, but these will be parts that will be no longer available when Go Go Diablo retires.
The bumpers on the double bogie wheels and the single bogie wheels prior to the idler sprocket have thick spacer washers under them to provide additional lift. The additional lift helps the track come off the drive sprocket cleanly and on to the idler sprocket more easily. These flat washers would have only come with the 502/3 models.


