Although looking similar, the chassis between the original 500 built in 1967 and the 502/3 built in 1968-69 are very different. Significant changes include heavier sheet metal, redesigned bogie rails with tubular build instead of angle iron toward the front and rubber bushings in pin holes, a stronger gearbox post and folded over edges that strengthen the side sheet metal. The later model chassis also have the two bars in the back to stop the track from slapping down against the Idler Sprocket.
An interesting item to note is that late in the production year for the 1967 Diablo 500, Bolens began to make changes to the chassis that carried over to the 502/3 model. I’ve seen these changes on Diablos with Serial Numbers starting around 15000. Bolens incorporated some of this better design in to the 500 chassis by riveting a bent support angle along the side edges of the chassis, adding the rounded angle iron in the bumper bracket mounting area, added the track bars, began using the newer designed bogie wheel station and also added the anti-flip pins near the bogie wheel mounting pivots.
.
The handle bars on the 3 models are different. Above (left picture) is shown a 500 on the left and a 502 on the right. The 500 only has one plate for the starter rope and choke. The 502 has an additional plate for the ignition switch and light switch. The 503 handle bars have both plates, but only one hole in each for the ignition switch and choke. The 503 bars also spread out wide toward the front to make room for the larger electric start Hirth motor.
Note that some 500 handle bars may have gusset welded on them (picture on the right). The 500 bars were constructed of thinner material and bend easily. A gusset kit was offered as a product up-date and would have been welded on the vertical mount posts toward the engine. When the gussets were added at the factory, they were installed on the same vertical post, but toward the driver. See below for further discussion about the gussets when the dashes are discussed.
500 dashes are easy to identify as they are very thin plastic with no folded over edges for strength. Being of such light weight construction, they often busted up easily. The two lower dashes above are from the 500. Note the lower dash has no slots cut in it and the middle dash has slots. The lower dash is an early production dash before gussets were added. The middle dash is cut to fit the gusseted handle bars. An interesting note is the Model Number decal on the original 500’s was located on the back side of this dash without the gusset slots. When Bolens began to make the slotted dashes, the decal was moved to the gearbox post.
The top dash is from a 502/3 and is made of much thicker plastic with folded over edges for added strength.
Nose cones are all very similar in design. The chrome nose cones are original with the 500. The chrome put on the plastic was a poor practice and most often the chrome peeled off leaving nothing but the bare plastic from underneath. With the 502/3, the nose cones were painted black and red. If your nose cones have rectangles cut in them by the headlights, then this nose cone is for a 503 which has different headlights than a 500 or 502.
The front tin behind the bumpers is shown above. The original 500 had only two bumper brackets (top tin). Later, Bolens shortened up the front tin and added two additional braces to the 500 (center tin). With production of the 502/3, Bolens shortened up the front tin even more (bottom tin) and utilized the 4 bracket design which stiffened up the bumper enough so that it could be utilized to pick up the front end of the sled.
Good metal straightening takes patients. Barrie Writes:
When I was doing my MGA, I bought a cheap set of body working hammers. They have a round flat en, a flat square end, a round convex end and a pointed end. I straightened this piece using a 4″ metal working vice and the anvil area located back of the jaws. For the worst bend, I used a section of an 8″ I-Beam as the hammering surface. You need a solid and straight piece of metal to hammer on. Working gently with the hammer, hammer on the bends. Don’t do one bend until it is straight, but work several in the area to bring them straight together. Twisting and pulling on the part also straightens it.
The half moon handles are chrome and used on the 500 and 502 Models. The 503 Model used the half moon handle for the brake, but used a thumb lever for the throttle. Above are shown the original pins and push caps. The pins are actually shovel handle rivets.
Although not a perfect match, we have found Stainless Steel Rivets and Chromed Push Caps that are close to the original hardware and add a nice finished touch to handle installations. The original throttle and brake cables were .080″ thick or about 5/16″.
I’ve not been able to find a resource for these thick cables with the stop on them, but 1/16″ cables are available. People often ask how to thread a cable through the handle bars. What I do is route the cable through the handle. Then wrap a piece of black electricians tape out past the end of the cable. This creates a loose and flexible pig tail that when feed through the pipe, can be grabbed with a dentist pick and pulled through the hole pulling the cable with it.
Hoods on the 500 have no louvers and were painted entirely red including a red plastic Nacelle Cover (hood air scoop). The 502/3 hoods have louvers and were painted with the white rally stripe.
Hoods often get bent out of shape, but they can be straightened easily. Barrie Writes
Often the top and front of the hood is a little concave in shape. It should be flat. A block of wood under the edge and some downward pressure with your foot will remove most of the concave shape. Don’t jump on it fast but rather gentle pressure until it bends and retains the new bend. Continue until you are satisfied. Moving the block towards the center also changes how much force you will need and where the hood will bend.
The louvers can be straightened by twisting them a little more open with a large screwdriver. This is actually making them a little longer which in turn can eliminate some waves in their form. Do this very gradually, a little at each end. This will not remove a severely bent louver. In that case, you are probably better off cutting out the old one and welding in a replacement.


Sandblasting is a must for a good restoration. It is the only way to get
the paint and rust out of the corners and seams.
Model 502/3 were equipped with a rubber snow shield to keep the snow off the drive belt.
All the Diablos were equipped with mud flaps. They can be made from conveyor belting and are 8″ by 30″.
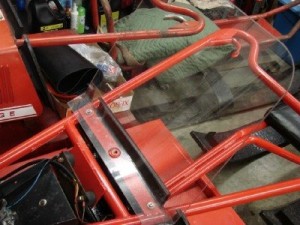
People often are looking for windshields. For a short time, Bolens put a windshield on the Diablo 500. But we suspect they caused injuries, so they were removed quickly and only a few are around anymore. Above are pictures of a windshield made by Jim D up in Fairbanks, Alaska. Jim writes:
The windshield is 3/16″ thick Lexan, 19-1/2″ wide, 18″ high plus 2-1/2″ on the bent base for a total of 20-1/2″ overall in length. The bend is a 120 degree bend towards the front of the machine or 60 degrees behind the windshield. You will notice that there are 3 washers under the base on each side and fastened with a pop rivet. A person could use a screw or bolt if they countersunk the head. I used a hole saw for the center hole on the base. The corners on top were cut with a jig saw and filed. I also cut the base to run parallel with the frame that holds the engine.
One word of caution is that installing a windshield on a Diablo can hurt you (right Mike?). Remember that as you drive a Diablo, the chassis can actively bounce back and forth causing the windshield to whip the same. Get too close and you get slapped in the head.


