Through my years of working on Diablos, there are a number of little things that I have learned. I would hate to see those little tidbits of information die when I am no longer around to help. With that, I started posting Diablo Helpful Hints on Facebook Groups and put those same hints here for others to see. I hope it helps you with your Diablo.
In no specific order and completely random, here we go.
Diablo Helpful Hint #1 – Chassis Tube Modification – all models
The drive sprockets come very close to the square tube frame on the chassis and if your track has shrunk like many do, it can be hard to get your track away from this hazard and the tube will cut your cogs off if they come in contact with each other. If you have your chassis apart, cut the one side of the square tube as shown and bend the tab inward to give your sprocket cogs additional clearance.


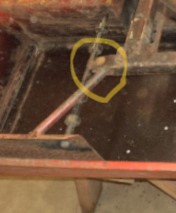
Diablo Helpful Hint #2 – Chassis Tunnel Modification – all models
Sometimes the clearance in the rear of the tunnel for the tracks is minimal and your tracks can rub on the tunnel or side rails. This is especially true if your tracks are not straight. You can loosen the bolts on the cross guide and cut the brace between the tunnel and side rail and add a piece in here to widen the space. On the 502’s and 503’s, this is a round tube. I like to add a 3/8″ nut and weld it in place. On the 500 models, this is a piece of flat bar. Once you weld a spacer in and widen the space between the tunnel and side rails, you will have to add some washers to the cross guide so as not to pull the side rail back inward.
Diablo Helpful Hint #3 – Gearbox Drain Plug – all models
There is no good way to tell how much oil is in your gearbox and a simple way to fix that is to install a drain plug. It’s simple and you can do this while the gearbox is in the Diablo.
Drill into the bottom of the gearbox with a 21/64″ drill bit being careful not to plunge into the chain on that last little bit of drilling. Tap a 1/8″ pipe thread and install a flush pipe plug. Now you can drain the oil every spring and put 4 ounces of 90w in every fall and you should be good for the winter.

Diablo Helpful Hint #4 – Gearbox Fill Port – Model 500
While on the gearbox subject, Diablo Helpful Hint #4 is about the Model 500 gearbox – add a fill port.
Drill a 1/2″ hole in the top of the gearbox and cover it with a plug. This allows you an easy access to add oil. You can do this as it sits n your Diablo. Just be careful to not let the drill bit catch at that last bit of drilling and plunge into the chain. If you get a few chips of aluminum down into the gearbox, believe me, it has seen worse contaminants than that.

Diablo Helpful Hint #5 – Hitch Ball Joint – all models
The hitch on a Diablo is an automotive ball joint with the rod cut off. I like to drill the hole out slightly larger so that it is easier to get the pin in. The ball joint did not come with a grease zerk, so if your Diablo has one, someone put that on. I just put a few drops of oil on the ball joint and that is all it needs. I’ve had people ask how they are supposed to get the nut on and I chuckle a bit and tell them a nut is not needed, just the pin.


Diablo Helpful Hint #6 – Piston Ring Pins on the Hirth 54R in the model 500 & 502
No matter if your motor in your 500 or 502 is blue or orangish red, the motors are the same and a special version of a Hirth 54R. My belief is that Bolens started putting Hirth motors in their early model 500 Diablos and then at some point, placed a larger order and had them painted the orangish red at the Hirth factory. The “special” design of this motor is the unusually small tapered shaft for the clutch. With that tidbit of information, this post is really about the piston.
If you know pistons, you know there is typically an arrow on the top of the piston that indicates the direction the piston should be orientated toward the exhaust port. If you have ever wondered why, it is because the manufacturers want the ring pins to be toward the intake side and the ring pins are opposite the arrow. On the cylinders, the intake port is lower on the cylinder than the exhaust port. With the ring pins toward the intake, the ring ends do not go past the port and do not have an opportunity to pop out of the groove and get pinched in the port breaking the rings.
On these early Hirth motors, many of the original 3-ring pistons had the arrow marked incorrectly (pointing toward the side of the piston with the ring pins). At the factory, assemblers put the pistons in according to the arrow and the pistons were put in backwards. In the picture, you can see the ring pins toward the exhaust side of the motor in this 500 motor.
If your rings broke off your piston, this is likely the reason why. If your motor still has the piston in backwards, it may still break the rings off at some point. I have flipped the piston around in a motor with slightly honing the cylinder to remove the glazing with success. Something to consider.


Diablo Helpful Hint #7 – Piston Rings on the Hirth 54R in the model 500 & 502
As mentioned, I believe the original pistons in the early Hirth motors is the 3-ring piston. This was the Hirth 014.26 Piston. Skirule Pete (Peter Purych from Blind River, ON) once told me that the 3-ring piston was found to create too much friction in the cylinder and thus causing pistons to burn. Later pistons only have two rings and the rings are thinner than the original. Pete’s suggestion when using the 014.26 piston was to remove the bottom ring and run the piston with only two rings.
When I think of the Hirth motor used in the Diablo with the motor on it’s side, it makes me believe the 014.26 piston in this orientation is even more prone to burn. The exhaust side of the piston is always the hottest and now with the motor on it’s side with the exhaust side down, the added weight of the piston on it’s side is also adding to friction. This is a good reason why it is so important to use good fuel, mix your gas/oil mixture properly and have a motor with good crank seals and gaskets.
If I am putting a new 014.26 piston in a motor rebuild, sometimes I remove the bottom ring, sometimes I don’t depending on who I am building the motor for and the motor’s expected use. If I am rebuilding a motor and it has a good 3-ring piston in it, I do not remove the bottom ring and run the motor as it is. I figure if it has lasted this long, why mess with a good thing.

Diablo Helpful Hint #8 – Headlights for the 503
The charging system in the Hirth motors has minimal charging capabilities. When I drive my 503 during the day, I don’t turn on the headlights and let the charging system keep the battery charged.
Headlight lamps in the 503 are 1141 bulbs. They use 18 watts each. If you don’t know that and replace the lamp with a typical 1156 bulb, those lamps pull 27 watts each. If your battery is going dead, one thing to check is to make sure you have the right lamps in your headlights.
For the frugal amongst us, LED 1156 lamps are available. They only pull 2.04 watts per lamp.
One last thing is that I solder the ground wire to the lamp base and use a 2-prong connector at the hood mount. This makes for a good grounding system without trying to ground through the hood hinge.
Happy Trails Everyone!


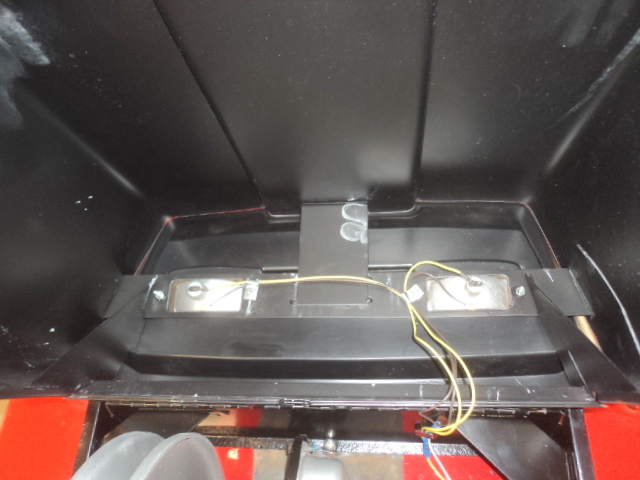
Diablo Helpful Hint #9 – 500 & 502 Headlights
The lamps in the original flush mount headlights on these models are a large diameter “festoon” lamp. The Hirth 54R motor aluminates these lamps with a stationary lighting coil energized by rotating magnets within the flywheel. The faster the motor is running, the brighter the headlights. And thus, when at an idle, the voltage is minimal and the lights are dim. This is why I do not use LED lamps as this minimal voltage is tough on those lamps and they flicker.
The headlights on these models have never been great. Often additional headlights were added only to find out they are dim also as the lighting coil can only generate a given amount of voltage and amperage. But, there is a way to make these headlights better.
First off, if your wiring harness has the diode in the wire between the motor and light switch, you can remove it. This should in theory double the amperage as the diode is taking away 1/2 of the sign wave generated by the lighting coil.
To do this, you have to replace the lamps as well. I use Xelogen Xenon lamps – some fancy name that I don’t know what it means. But, they stand up to the extra power and the lights are much better even at an idle.


Diablo Helpful Hint #10 – Add a hole in the 503 motor housing.
The biggest killer of starters on our 503’s is moisture. These motors were designed to be mounted upright. The flywheel acts like a fan and pulls air in and sends it out around the cylinder head for cooling. When you drive around in the powdery snow and it gets pulled into the cooling circuit, some of it melts and ends up in the casing.
When the motor is upright, there are no issues. Some of these motors even have drain holes in the bottom of the housings to let the water drain. But when they are mounted on their sides and the starters are now under the motors, the water builds up and runs down into the starters.
A fix for this is to drill a good size hole in the housing of the motor.

Diablo Helpful Hint #11 – 503 Starter
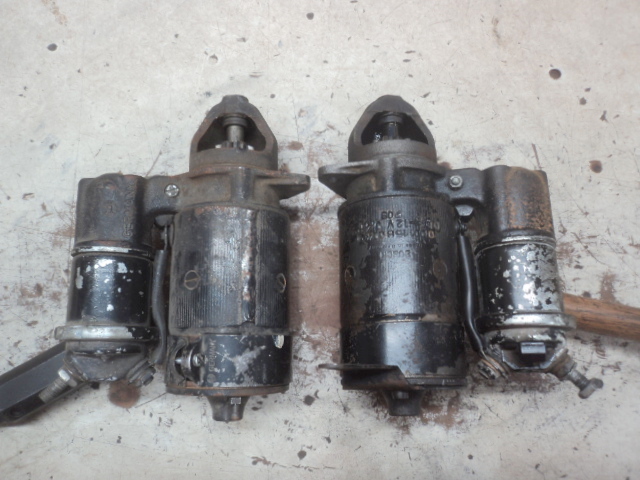
The starter on a Diablo 503 is very rare. It is a Bosch 001 158 004. I call this the “158” series of starter. The last three digits of the starter number dictate the orientation of the starter solenoid.
For instance, here are two starters. They are both 001 158 starters but the starter on the left is a 001 158 003 and the starter on the right is a 001 158 004. The only difference in these starters is the nose cone. You can take everything off the 003 starter nose cone and put it on the 004 nose cone to fix a starter.
For sure, a 001 158 001, 002 and 003 starter can replace the 004 starter reusing the nose cone from the 004. They all turn the same direction and those starters are far more common.
Diablo Helpful Hint #12 – Vibration Preparation
With any of these sleds, there is vibration. Some things I do to avoid issues are:
-
Solder any ends of wires that go into the connection blocks on the motors
-
Use locknuts on as much of the chassis hardware as possible.
-
I use larger machine screws for the headlights on all models and put a dab of “wicking” Loctite on the nuts.
-
Install new rubber motor mounts if the old ones are sagging or hard.
-
On the 500 and 502 models on the bottom motor mounts, I add a 3rd rubber motor mount.
-
For the serious enthusiasts, if you have the motor apart, have the crank checked for excessive runout. A crank out of whack will vibrate the handlebars like nothing else!


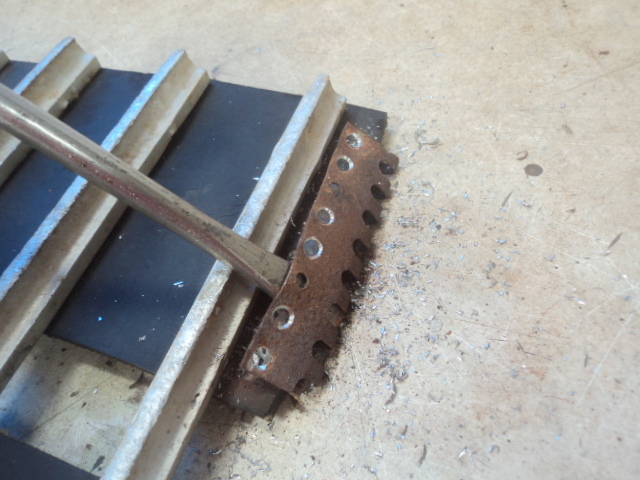
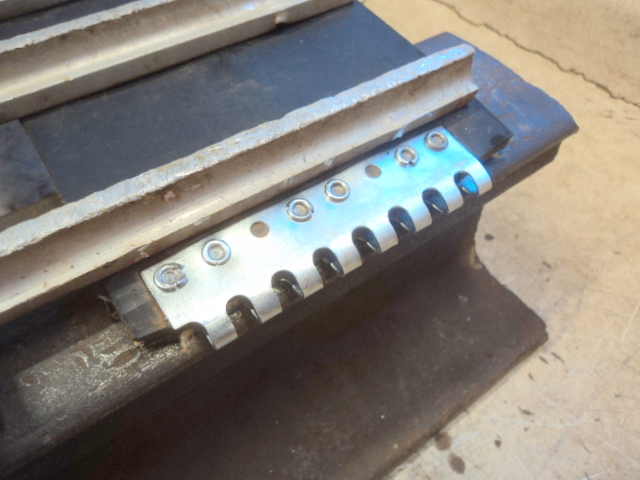
Diablo Helplful Hint #13 – Track Cleat Replacement
When cleats get bent on a track, they can often be straightened. I take the tracks off to work on them as any other attempt usually ends in frustration. Once off, you can lay a bent cleat against a piece of railroad iron and a whack with a hammer makes them straight again.
A broken cleat or badly twisted cleat is another issue. It is best to drill out the rivet head and remove the cleat. Then put a new or refurbished cleat into the track upside down over a piece of railroad iron. I use a hollow rivet punch to peen over the hollow end of the rivet. It makes a very nice looking peen.
If you do not have cleats, your option is to buy them or refurbish some old cleats off another track. The rivets are 3/16″ diameter by 5/8″ long. The trick is to be able to grind out the existing peen holding the rivet rail in place and reusing the rivet rail with new rivets.


Diablo Helpful Hint #14 – Track Lacers
The hoops on track lacers can wear thin and when they get too thin, they rip through and leave you stranded out on the trail. You can replace the lacers easily enough with new stainless steel lacers.
Drill out the old rivets and peel the lacer off. Install the new lacers and peen down the rivets. A close up of the rivet punch and results.


Diablo Helpful Hint #15 – Track Adjustment
The most important thing about adjusting the tracks on a Diablo has nothing to do with the tracks. It’s the gearbox we are trying to save!
Track lengths vary. Measuring from rubber to rubber, I’ve seen them under 104″ and over 107″. Sometimes I wonder how that is possible. I do think tracks shrink over time. If a track is bowed, I think this is a result of the way it was stored. For instance, if one belt is in the sunlight and one is not, the one belt shrinks more than the other and thus the track overall is bowed. In my experience, there is no fix for a track that is bowed.
But back to adjusting the tracks. The jack bolts move the bearing blocks on the gearbox output shaft. The gearbox wants to be square in the chassis. If you have one track longer/shorter than the other and try to adjust the jacking bolts so the tracks have equal tension, the gearbox will be cocked in the chassis. This causes the seal to leak and bearing in the gearbox to fail.
So adjust the jacking bolts so they stick out equal distances on each side and what you are trying to do is make sure the bearing blocks are at equal distances from the chassis tubing thus squaring the gearbox in the chassis. If one track is longer than the other, it will be loose and the other track will be tight. That’s just the way it is.

.
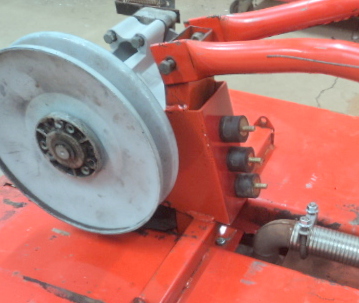
Diablo Helpful Hint #16 – Add a 3rd rubber motor mount to the bottom end of 500’s & 502’s
The bottom end motor mounts have just enough strength to hold the motor as they are, but it is easy to add a 3rd mount between the existing two and add additional support. Just drill a 1/4″ hole right between the existing two holes and tap in a 5/16-18 thread. Then drill a 3rd hole in your motor mount.
.